Including an Interactive Example
Survey Answer & Variable Piping
Piping allows you to automatically incorporate survey information into various questions and answers throughout your survey. This feature enables a more personalized feel for your respondents, helping to increase response rates. There are two types of piping available; answer piping and custom variable piping.
Piping is currently unavlable as of 10/1/2025, but we hope to add it back soon.
Answer Piping
Answer piping takes an answer from a question and places it into a question (or answer choice) at a later point in the survey. Answer piping is applied when a respondent clicks "Next" to go to the next survey page. The question which the piped text comes from is called a "Sender Question". The question or answer choice where this piped text is placed is called a "Receiver Question". Only certain types of questions qualify as a "Sender" or "Receiver" question.
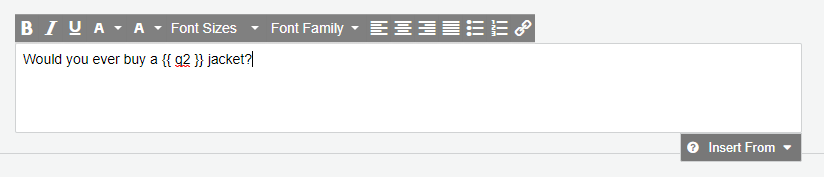
Let's say you have a survey in which you ask a respondent what their favorite color is for question #1. You can then pipe their answer into other questions or answer choices. If they selected blue as their favorite color, you can pipe that into the next page and ask a question such as "Would you buy a blue jacket?".
Sender Question Types
- Multiple Choice
- Dropdown
- Rating
- Input Box
- Net Promoter Score
Receiver Question Types
- Multiple Choice
- Dropdown
- Rating
- Matrix
- Input Box
- Multiple Text Boxes
- Checkbox Grid
- File Upload
- MaxDiff
Custom Variable Piping
Variable piping allows you to place custom data into your survey. For email invitations this information can be uploaded into the reciepent grid. Email invitation also allow you to pipe the respondent email address into the survey. For web links this information would be included in the survey URL, like in the example below. Variable piping is useful to include meta data such as a respondents name, ID, department, or order number into a survey.
Up to thirty custom variables can be included in your survey and piped. By default the names for the custom variables will be displayed as "Custom 1", "Custom 2", etc. To edit these default names go to the "Manage" page within your survey.
How to Setup Piping
To insert a new piping variable simple click the question text or answer choice, then click the box label "Insert From" to the bottom right. From here you can click the answers or variables you wish to pipe.
Up to thirty custom variables can be included in your survey and piped. By default the names for the custom variables will be displayed as "Custom 1", "Custom 2", etc. To edit these default names go to the "Manage" page within your survey.
Tips & Troubleshooting
- Piping will be displayed inside of the survey builder with two curly braces around the variable. Once you preview or send out the survey, those braces and variables will be replaced with the piping text.
- It is best to make "Sender Questions" required. If they are not required and a respondent skips over the question, the piping will simply display no value (including no curly braces).
- Add piping only after you complete designing your survey. Piping variables are dependent on the question order, and thus will not update atomically when you rearrange questions or pages.
- You may notice if you insert a piping variable for a question the number inside the curly braces doesn’t match the order number of a certain question. Internally, elements such a "Presentational / Text" and "Images" are internally ordered. This would need to be accounted for if you tried to trace the order number back to the number displayed in a piping variable.